DEAR TIM: I have decided to install a slate floor in my kitchen. What must I do to make sure the slate will stay adhered to the floor? What tools will I need? Can I apply the slate to a wood subfloor? Will grouting the floor be difficult? Harold W., McCall, ID
DEAR HAROLD: Congratulations! The slate floor you are about to install will garner you endless compliments. Slate has so much character and is nearly indestructible. Once sealed, its micro-crystalline composition makes it very stain resistant. If you want an eye-popping color, consider using burgundy red slate with a deep gray grout. This rich color goes well with many kitchen cabinets.
Let's talk about tools first. You will need a chalk line, a tape measure, a framing square, a special square-notched trowel, a large sponge, knee pads, buckets, a three-inch wide stiff blade scraper, a grout float and most importantly a diamond-blade wet saw. You can substitute an abrasive blade on an old circular saw or a hacksaw with a carbide rod blade in lieu of the diamond wet saw.
Slate can be installed on a wood subfloor if the wood flooring is a minimum of one and one quarter inches thick. You can do this by applying half-inch thick plywood over a traditional three-quarter inch thick subfloor material. Screw the half-inch thick plywood to the existing subfloor spacing the screws every eight inches on center. Apply a thin coat of water-based urethane to the final layer of plywood. This urethane prevents swelling by stopping water from soaking into unprotected plywood. Installing one-half inch thick cement board on top of the regular three quarter inch subfloor is a better choice if that option still remains.
You may also decide to use a crack isolation fabric between the slate and the wood flooring. These fabrics work well to offset any differential movement between the wood subfloor and the slate. Wood can expand and contract with seasonal changes in humidity. Slate will not react to these same seasonal changes. The fabric absorbs the differential movement between the materials.
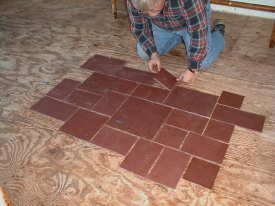
The layout of slate is very important. Although most slate floors appear to be a hodgepodge of random pieces, they are actually different-sized pieces that carefully interlock in a very regular repeating pattern. The pattern is almost always printed on the carton or included in a piece of paper within the carton. You need to remove the slate from just one of the cartons and lay it on the floor carefully spacing to create the pattern the manufacturer has in mind.
The spacing between individual pieces of slate will often be 5/16ths or perhaps as large as 3/8 inch. As you dry lay the pieces of slate you will see that the spacing between pieces happens somewhat automatically. Do not begin to mix any thinset until you are sure you have the spacing correct and you know how the slate will interlock from carton to carton.
After the slate is installed, let the thinset cure for 48 hours before you gingerly walk on the slate. It is now time to apply a grout-release liquid or better yet, a special wet-look sealer to the slate. These products will make grouting much easier as grout can get trapped in the cleavage texture of the slate. It may take 24 hours for these liquids to fully cure before you can begin to grout.
The grouting process is important. The grout must be the consistency of cake batter. Wipe off all excess grout from the slate. Squeeze as much water from the sponges as possible when you use them to remove excess grout from the slate. Excess water that seeps into the damp grout will severely weaken it causing it to crack, powder and disintegrate over time. You must get all traces of grout from the slate before the grout dries. There will be a slight haze of grout powder on the slate, but that will come off the slate with a dry towel after the grout has completely dried.
Static pressure is very important. The layout of the slate is extremely critical. The pattern printed on the box produces a shape that is rectangular in nature. Once the spacing between the pieces of slate is uniform, there will be a consistent width and height to the rectangle when you measure to the outside edges of specific pieces of slate that create the shape.Using these width and height measurements you can make sure the slate installation is square throughout the entire room. Use these measurements to create a grid layout on the floor. The edges of the slate pieces will touch up against the grid lines if you continue to install the pieces correctly.


